Autonomous driving research with CARLA simulator
This is a short version of my article published here

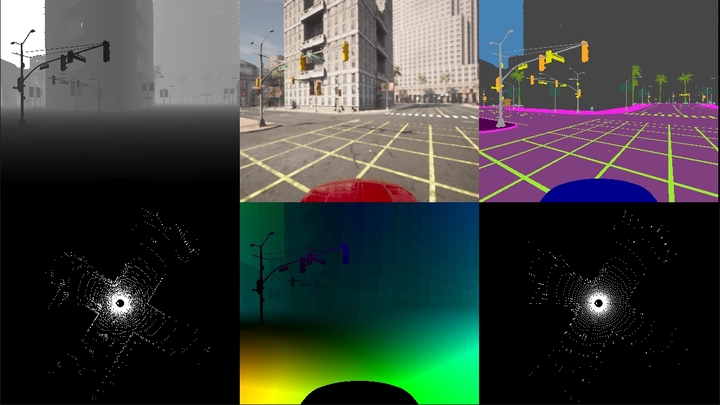
Visualization of different data streams generated by the simulator (Depth, RGB, Semantic Segmentation, LiDAR, Optical Flow, Semantic LiDAR).
Introduction
The autonomous driving industry in order to advance through its six levels of automation (as defined by SAE, Society of Automotive Engineers [1] is going to be increasingly more data-driven. While the amount of sensors and their technology have been increasing it is still both cost effective and in some cases necessary to use a simulator considering that deploying even a single autonomous car could necessitate funds and manpower and still be a liability in terms of safety.
A simulator for autonomous driving can provide a safe and virtually cost-free controllable environment for research and development purposes but also for testing dangerous to reproduce corner cases.
The CARLA simulator is a free and open source modular framework exposing flexible APIs built on top of the Unreal Engine 4 (UE4) and released under the MIT license. It was developed from the start with the intent of democratizing research in the industry by providing academics and small companies a customizable platform to perform cutting-edge research and development for autonomous driving, bridging the gap with large companies or universities that have access to a large fleet of vehicles or a large collection of data.
The simulator was firstly published in a paper [1] by Alexey Dosovitskiy, German Ros, Felipe Codevilla, Antonio Lopez, and Vladlen Koltun at the Conference on Robot Learning 2017
The CARLA project also includes a series of benchmarks to evaluate the driving ability of autonomous agents in different realistic traffic situations. More info is available at [4] where the CARLA Autonomous Driving Challenge is part of the Machine Learning for Autonomous Driving Workshop at NeurIPS 2021.
What can CARLA be used for
CARLA simulator provides a feature rich framework to test and research a wide range of autonomous driving related tasks. It supplies the user with a digital environment made up of various urban layouts, buildings and vehicles along with a flexible configuration capable of specifying all aspects concerning the simulation. As an example the user has complete control in real time over vehicle and pedestrian traffic and their behavior, traffic lights, weather conditions.
Along with the environment also the ego vehicle is highly customizable in terms of its sensor suite. The provided APIs let the user collect data from simulated sensors such as RGB, Depth, Semantic Segmentation cameras and LIDAR. But it is also possible to use less common triggers such as lane-invasion, collision, obstacle and infraction detectors. The APIs grant the user a fine grained control of every detail of the simulation allowing task as data collection for supervised learning, such as shown in 2 where a dataset of semantic segmentation images composed of pairs with and without dynamic actors is collected, or training of a reinforcement learning model, or a imitation learning model as in 3 possible.
How CARLA works under the hood
By being implemented as an open-source layer over Unreal Engine 4 (UE4) CARLA comes with a state-of-the-art physics and rendering engine. The simulator is implemented as a server-client system in which the server side is in charge of maintaining the state of every actor and the world, physics computation and graphics rendering while the client side is composed by one or multiple clients that connect requesting data and sending commands to control the logic of actors on scene and to set world conditions.
To learn more about CARLA we refer readers to its project site.
Getting Started Carla offers pre-built releases for both Windows and Linux, but it can be built from source on both systems following the guide 5. Carla is also provided as a Docker container. As of the time of writing CARLA latest version is 0.9.13 and the provided Debian package is available for both Ubuntu 18.04 and Ubuntu 20.04.
The recommended requirements suggest a 6GB to 8GB GPU and a dedicated GPU is recommended for training. CARLA uses Python as its main scripting language, supporting Python 2.7 and Python 3 on Linux, and Python 3 on Windows.
Installing
sudo apt-key adv --keyserver keyserver.ubuntu.com --recv-keys 1AF1527DE64CB8D9
sudo add-apt-repository "deb [arch=amd64] http://dist.carla.org/carla $(lsb_release -sc) main"
Then
sudo apt-get update # Update the Debian package index
sudo apt-get install carla-simulator # Install the latest CARLA version, or update the current installation
cd /opt/carla-simulator # Open the folder where CARLA is installed
Once installed the server as of 0.9.12 you also need the CARLA client library
pip install carla
And the Pygame library
pip install --user pygame numpy
The server
To launch the server:
cd path/to/carla/root
/CarlaUE4.sh
Now we should see a pop up window showing the fully navigable environment in the spectator view, the server is now running and waiting for a client to connect, by default on port 2000. o launch the server headless, or off-screen:
./CarlaUE4.sh -RenderOffScreen
Next step is to develop a client script that will interact with the Actors inside the CARLA environments. The repo provides multiple base clients examples here.
The client
We’ll go over some of the introductory examples to show some of the basic concepts.
We start by creating a client and connecting to our carla server running on port 2000
client = carla.Client('localhost', 2000)
client.set_timeout(2.0)
Then we get the current environment state:
world = client.get_world()
In order to access, customize and finally instantiate actors in the scene we need to familiarize with blueprints first. Blueprints are premade layouts with animations and a series of attributes such as vehicle color, amount of channels in a lidar sensor, a walker’s speed, and much more.
Once we accessed the library:
blueprint_library = world.get_blueprint_library()
We can filter its contents by using wildcard patterns, instantiate it and spawn it in the world:
vehicle_bp = random.choice(blueprint_library.filter('vehicle.*.*'))
transform = random.choice(world.get_map().get_spawn_points())
vehicle = world.spawn_actor(vehicle_bp, transform)
Now we can get to the data collections tools, and mount some sensors on our vehicle:
camera_bp = blueprint_library.find('sensor.camera.depth')
camera_transform = carla.Transform(carla.Location(x=1.5, z=2.4))
camera = world.spawn_actor(camera_bp, camera_transform, attach_to=vehicle)
